inside Alan's cluttered head
geeky stuff
General topics that geeks like.
Converting miniDV movies into MP4
0
7 years
When I was a kid, the state of the art for home movies was 8mm film. My parents had a movie camera that used a film cartridge that contained a 16mm film strip. They would insert the cartridge one way and record a few minutes of film, and then flip the cartridge over and record another few minutes. To develop the film, the processing company would open the film cartridge and split the long reel of 16mm wide film into two reels of 8mm wide film. They only took 25 reels of film over a span of 12 years. Back in 2012, I found a place that would convert the movies to DVD, and I kept an MP4 version on my computer, and I gave copies to everyone in my family. It was pretty awesome.
By the time my kids came along, the world had moved to videotape, and we were just moving from analog to digital. We went top-of-the-line with a Sony MiniDV (NTSC) recorder. The NTSC DV video files record 720×480 pixels at 30fps… far from the 1080p videos that you’d shoot on your iPhone today, but pretty hot for 2001. Like my parents, we ended up recording 20 MiniDV tapes over a period of 12 years, although our tapes were 60 minutes each instead of about 5.
This is the story of converting those tapes to a modern video format.
My 20 tapes sat on a shelf for several years, and then in 2012 I finally had the tools needed to copy the raw digital DV files to a computer hard disk. I used a tool called “dvgrab” on a laptop that had a FireWire connector. One side effect of dvgrab was that it saved every scene in a separate timestamped file. This turned out to be quite fortunate. When I was done, I had 250GB of raw DV files on an external hard drive. Unfortunately, I did not have enough disk space to do any processing on these files, so this external USB hard disk sat on a shelf for five years.
In 2017 I re-discovered this USB hard disk, and I decided to finish the job. I wanted to encode them in MP4 format, and I wanted them to be separated into “episodes” (such as “2003 beach”, “4th birthday”, “zoo” and so on).
The first step was to divide the 5000+ separate scene files into folders for episodes. I started with a script that looked at the timestamps in the filenames, and it moved them into folders based on that. This got me 90% of the way there. Here’s the script. It used a single variable for the “gap” in time that would mean a break to the next episode.
#!/bin/bash

GAP=$((60*90))

previous_timestamp=0
for x in $(ls -1 ALL/dvgrab-20*.dv | sort) ; do
    oldfolder=$(dirname $x)
    file=$(basename $x)
    # dvgrab-2011.02.12_19-04-58.dv
    year=${file:7:4}
    mon=${file:12:2}
    day=${file:15:2}
    hour=${file:18:2}
    min=${file:21:2}
    sec=${file:24:2}
    timestamp=$(date +%s -d "$year-$mon-$day $hour:$min:$sec")
    if [[ $(( $timestamp - $previous_timestamp )) -gt $GAP ]] ; then
        newfolder=$(date "+%Y-%m-%d_%H-%M-%S" -d "@$timestamp")
        mkdir $newfolder
    fi
    mv -v "$x" "$newfolder/$file"
    previous_timestamp=$timestamp
done
After I had the scenes grouped into episodes, I did an initial encoding of the entire thing. This ran overnight, but it could go unattended. The basic process was to concatenate the DV files and the use “ffmpeg” to encode the episode into an MP4 file. I used the following script to do this in a loop.
I ran this script many times, and it over time I tweaked the ffmpeg options to get a better output. This is the final cut.
#!/bin/bash

TMP="/tmp/encode"
srcdir="/media/alan/sandisk248GB/MINIDV"
destdir="/home/alan/media/videos/minidv"
wildcard="20*"  # directories starting with a date from 2001 onwards

ffopts=""

# FILTERS
ffopts="$ffopts -vf yadif"   # de-interlacing

# VIDEO ENCODING OPTIONS
ffopts="$ffopts -vcodec libx264"
ffopts="$ffopts -preset medium"  # balance encoding speed vs compression ratio
ffopts="$ffopts -profile:v main -level 3.0 "  # compatibility, see https://trac.ffmpeg.org/wiki/Encode/H.264
ffopts="$ffopts -pix_fmt yuv420p"  # pixel format of MiniDV is yuv411, x264 supports yuv420
ffopts="$ffopts -crf 23"  # The constant quality setting. Higher value = less quality, smaller file. Lower = better quality, bigger file. Sane values are [18 - 24]
ffopts="$ffopts -x264-params ref=4"

# AUDIO ENCODING OPTIONS
ffopts="$ffopts -acodec aac"
ffopts="$ffopts -ac 2 -ar 24000 -ab 80k"  # 2 channels, 24k sample rate, 80k bitrate

# GENERIC OPTIONS
ffopts="$ffopts -movflags faststart"  # Run a second pass moving the index (moov atom) to the beginning of the file.

for folder in $(cd $srcdir ; ls -1d $wildcard) ; do
    echo ; echo ; echo ; echo ; date ; echo $folder ; echo
    # do not overwrite existing files
    if [[ ! -f $destdir/$folder.mp4 ]] ; then
        mkdir $TMP 2> /dev/null
        cat $srcdir/$folder/*.dv >> $TMP/$folder.dv
        ffmpeg -i $TMP/$folder.dv $ffopts $destdir/$folder.mp4
        rm -frv $TMP
    else
        ls -l $destdir/$folder.mp4
    fi
done
The next step was the most time-consuming (but fun) part. I wanted to curate all of the “episodes” to make sure that they each contained a single subject in its entirety. I found a few variations:
- A single file contained two subjects: this happened if two things occurred without a 90-minute “gap” between them.
- A single episode spanned two files: this happened when there was a 90-minute “gap” in the action
- A lead-in or fade-out that fell outside of the main timespan of the episode: this happened if I had taped an intro graphic (usually I just wrote on an index card and taped a few seconds of that) the day before an event, or if I started the next event by fading out the last image from the previous event.
- Occasionally, a single DV file needed to be split into two. Although dvgrab usually broke scenes into files of their own, sometimes it would concatenate two scenes.
- There were a few scenes that needed to be deleted: mis-takes, “blank filler” at the end of a tape, and so on.
To do this curation step, I loaded up “VLC” video player with a playlist of all of the episodes, and I simply watched them at 4x speed. I’d skip through predictable bits, and pay very close attention to the beginning and end of each episode. When I found something wonky, like a fade-out in its own separate directory, or a fade-out at the beginning of the next episode, I would find that DV file in the original directories and move it to the proper one.
When I was done, I simply deleted the MP4 files ran the encoding script again.
I noticed that the files would not play on my iPhone, and so I spent some time tweaking the ffmpeg options and re-encoding a few files (I limited it by changing the “wildcard” variable). Once I found the right options, I changed the wildcard back, deleted the MP4 files, and re-ran the encoder over all of the files again.
When it was all over, I ended up with 349 “episode” files in MP4 format, taking up 9.2 GB of disk space (much less than the 250 GB of the original DV files).
Native IPv6 on TWC at home
0
8 years
About a year ago, we switched from AT&T DSL to Time Warner Cable. I bought my own cable modem, a Motorola Surfboard SB6141 (hardware version 8). Time Warner’s web site said that they support the SB6181, but it turns out they only supported some earlier hardware versions of the SB6181. Basically, the modem worked for IPv4, but I found that it did not support IPv6, even though I know Time Warner’s network supports it. To get the modem to work with IPv6, I would have to wait for a firmware upgrade, which is something that Time Warner would have to make available, and then my modem would automatically install the next time it rebooted.
So I set up a cron job to reboot the modem every week. It would curl into the modem’s web interface and press the “reboot” button on the web form. Then it would wait for the modem to come back up, and it would look at the firmware version number. If the version number had changed, I would get an email. Furthermore, it would run rdisc6 eth0 to see if any IPv6 routes were being advertised, and if they were, I would get an email.
Nine months later, I got the email! They had upgraded my modem, and I had native IPv6 support! So I needed to log into my router (a Zotac ZBox C-series mini-sized computer running Ubuntu) and turn off the Hurricane Electric tunnel and configure it to use the native IPv6. This turned out to be easier said than done. I spent the entire day and part of the next doing just that.
What needed to be done
On an IPv4 network, your ISP assigns a single IP address to your router, and you choose an unrouted private subnet to use on your home network (10.x.x.x, 172.16-31.x.x, or 192.168.x.x).
For IPv6, all of your addresses are routable, which means they come from your ISP. But they do assign two subnets to you: one (IA, or Identity Association) is for the router itself, and the other (PD, or Prefix Delegation) is for your home network. Typically, the IA will be a /64 subnet and the PD will be something larger, like a /60 or /56. You can split up that pool of IPs into smaller /64 subnets for each network segment in your home (maybe one for eth1 and another one for wlan0).
First things first
We need to set a few system parameters in order for our router to actually route IPv6 traffic.
-
We have to tell the kernel to forward traffic.
In /etc/sysctl.conf, add the following two lines:
net.ipv6.conf.all.forwarding=1andnet.ipv6.conf.default.forwarding=1. -
We have to accept router advertisements from our upstream.
Normally, if you’ve turned on forwarding, then the kernel will ignore router advertisements. But they’ve added a special flag for routers like ours. Add
net.ipv6.conf.eth0.accept_ra = 2to /etc/sysctl.conf. -
Apply the changes.
These changes will be applied at the next reboot. You can do
sysctl -p /etc/sysctl.confto read those parameters into the kernel immediately.
Stuff I tried that didn’t work
At first, I experimented with the /etc/network/interfaces file and the built-in ISC DHCP client. I could not figure out how to make that do anything. Documentation is sparse and mainly concerned with traditional IPv4 DHCP use cases.
Then I played with the Wide DHCPv6 Client or dhcp6c. It looked promising, because its configuration file had all of the right options. It allowed you to ask for an IA and a PD, and you could specify how to slice up the PD space into smaller subnets for other interfaces. However, when I ran it, I got an (IA) IP address on my external interface, but I never got a (PD) IP address on my internal interface, and I never saw any internal routes added. I spent many hours trying to get this to work. For the record, here is the config that I used:
# /etc/wide-dhcpv6/dhcp6c.conf
interface eth0 { # external facing interface (WAN)
  send rapid-commit;
  send ia-na 0;  # request bender's eth0 network to talk to the router
  send ia-pd 0;  # request bender's eth1 network to share with the house
};

# non-temporary address allocation
id-assoc na 0 {
};

# prefix delegation
id-assoc pd 0 {
  # internal/LAN interfaces will get addresses like this:
  # (56-bit delegated prefix):(8-bit SLA ID):(64-bit host portion)
  # SLI ID's start with 1, go up to 255 (because SLA-len = 8)
  prefix-interface eth1 { # internal facing interface (LAN)
    sla-len 8;  # bits of "our portion" of the PD subnet
    sla-id  1;  # eth1 gets sub-network number 1 out of 255 (8 bits)
    ifid    1;  # bender's eth1 IP address will end with this integer
  };
};
What worked – dibbler and some duct tape
There is another DHCPv6 client called “dibbler” that I had heard good things about. So I installed it, and armed with my knowledge learned from dhcp6c, I was able to get a configuration that worked… sort of. It would require some assistance.
With the following configuration, dibbler-client will request an IA and a PD on eth0, and it will create a route on eth1 for its slice of the PD.
# /etc/dibbler/client.conf
log-level 7
downlink-prefix-ifaces "eth1"
inactive-mode
iface eth0 {
    ia
    pd
}
script "/etc/dibbler/script.sh"
But after dibbler-client runs, the network is still not really ready to use.
- The internal interface does not have an IP address on its slice of the PD.
- The system does not have a default route.
These things can be fixed by a helper script. Fortunately, dibbler allows us to specify a script that will run every time some change takes place. Here is the script that I wrote. It does not take any information from dibbler itself. It simply looks around the system and fills in the missing pieces.
#!/bin/bash
# /etc/dibbler/script.sh

router_iface="eth0"
internal_iface="eth1"

function log () {
    printme="$*"
    echo "$(date '+%F %T') : $printme" >> /var/log/dibbler/script.log
}

log "started with arguments >> $*"

# check for default route
if [[ $(ip -6 route | grep -c default) -gt 0 ]] ; then
    # default route found
    log "default route found >> $(ip -6 route | grep default)"
else
    # no default route - look for route advertisements
    log "default route not found"
    router_ip=$(rdisc6 $router_iface | grep '^ *from' | grep -o '[0-9a-f:]\{4,\}')
    if [[ -n $router_ip ]] ; then
        route_command="ip -r route add ::/0 $router_ip dev $router_iface"
        log "adding route >> $route_command"
        $route_command
        log "return code was $?"
    fi
fi

# check for internal network IP
internal_ip="$(ip -6 addr show dev $internal_iface | grep 'scope global' | grep -o '[0-9a-f:]\{4,\}')"
if [[ -n $internal_ip ]] ; then
    # internal IP is set
    log "internal IP found >> $internal_ip"
else
    # internal IP is not set
    log "internal IP not found"
    prefix="$(ip -6 route | grep $internal_iface | grep -v 'proto kernel' | grep -o '[0-9a-f:]\{4,\}::')"
    if [[ -n $prefix ]] ; then
        ip_command="ip -r addr add ${prefix}1/64 dev $internal_iface"
        log "adding IP >> $ip_command"
        $ip_command
        log "return code was $?"
        # restart radvd
        systemctl restart radvd
    fi
fi
After the script runs, the router will be able to communicate with the internet using IPv6, and the other machines on the internal network will be able to communicate with the router.
NOTE – The version of dibbler (1.0.0~rc1-1) that comes with Ubuntu 15.10 crashed when I ran it. So I had to download a newer one. At first, I downloaded the source code for version 1.0.1 and compiled it. That seemed to work OK. But later, I grabbed the dibbler-client package (1.0.1) for Ubuntu 16.04 and installed it using “dpkg”. I prefer to install complete packages when I can.
The last step – advertise your new subnet to your network
When the machines on your network come up, they will look for route advertisements from your router. We need a RA daemon to send these out. The most common one is radvd.
While researching this setup, I saw several references to scripts that would modify the radvd config file, inserting the route prefixes that were assigned by the upstream prefix delegation. To me, this idea seemed like yet more duct tape. Fortunately, radvd does not need to be reconfigured when the prefixes change… it is smart enough to figure out what it needs to do. To make this happen, I used the magic prefix “::/64”, which tells radvd to read the prefix from the interface itself.
# /etc/radvd.conf
interface eth1 # LAN interface
{
    AdvManagedFlag off; # no DHCPv6 server here.
    AdvOtherConfigFlag off; # not even for options.
    AdvSendAdvert on;
    AdvDefaultPreference high;
    AdvLinkMTU 1280;
    prefix ::/64 # pick one non-link-local prefix from the interface
    {
        AdvOnLink on;
        AdvAutonomous on;
    };
};
Conclusion
That might seem like a lot for something that should “just work”. It turns out that the default ISC DHCP client does “just work” for a simple client machine.
But for a router, we need to be a little more explicit.
- Set up the kernel to forward and accept RAs.
- Set up dibbler to ask for IA and assign the external IP address.
- Set up dibbler to ask for PD and set up a route on internal interfaces.
- Use a helper script to assign IPs on the internal interfaces.
- Use a helper script to make sure the default route is set.
- Use radvd to advertise our new routes to clients in the home network.
I hope this record helps others get their native IPv6 configured.
The Wrist Watch Boneyard
1
8 years
Audrey was looking for a replacement battery for an old watch, and that got me looking through my own wrist watch boneyard. I gave up wearing watches in 2008.
Back in the late 1990’s and early 2000’s, I wore one of these:

The Casio ABX-20 was an analog watch with a digital display that floated above the hands. I thought it was pretty cool at the time (although I am sure everyone else thought it was dorky). I also had a couple of Timex “Expedition” analog/digital watches — they had Indiglo backlights.
I still think the analog/digital dual format is pretty cool.
Sadly, the Casio ABX-20 is beyond repair. But while we were getting a battery for Audrey’s watch, I picked up a few batteries for some of the other boneyard watches, just to take them for a nostalgic spin.
Thunderbird keyboard hack
1
9 years
I’ve used Mozilla Thunderbird to read my email for years, and for the most part, I think it’s a pretty nice email client. But lately I’ve developed an itch that really needed scratching.
I tend to use the keyboard to navigate around through applications, and so in Thunderbird, I find myself using TAB to switch between the list of mail folders on the left and the list of messages on the right. The problem is that a few years back, when they added tabbed views, they changed the way that the TAB key works. (I’ll try to be clear about the tabbed views and the TAB key, which unfortunately share the same name). After the addition of tabbed views, the TAB key no longer toggled between just the (1) folders pane and (2) messages pane, but now it toggled between (1) folders pane (2) messages pane (3) tab selector widget. So that means I had to re-train myself to press the TAB key once to go from folders to messages, and twice to go from messages back to folders. But it got worse. If you turn on something like the Quick Filter, the TAB key toggles between (1) folder pane (2) messages pane (3) tab selector widget (4) the Quick Filter.
Basically, the TAB key works like it does in a web browser, which is pretty much useless when there are so many widgets that can accept focus.
Today I discovered that what I was really looking for was the F6 key. It strictly changes focus among the visible window panes. For me, most of the time, that’s (1) folder pane (2) messages pane, but if I turn on message previews (rarely), it expands to (1) folder pane (2) messages pane (3) preview pane.
THIS MAKES SENSE. Within the main window (tab) that I am looking at, the F6 key moves between the major window panes. Awesome.
However, wouldn’t it be cool if I could use the TAB key to do this focus-switching, instead of lifting my fingers off of their pseudo-home position to get way up to F6 (which I can’t find just by feel — I have to look down at it)?
A little bit of searching led me to extensions, such as the very old but still usable “keyconfig”. This is a pretty opaque tool that lets you insert some sort of arcane code into the prefs.js file. Basically, it did not help me do anything, but it did help me understand how keys are mapped. Deeper searches led me to the “DOM Inspector”, which lets you view the document that is being rendered (apparently, views in Thunderbird are pretty much HTML documents, which I suppose was hip at the time). That led me to some of the arcane codes that are mapped to certain keys.
So here’s what I tried. I looked at the arcane code that is mapped to F6, and I looked at the way “keyconfig” inserted some mappings of key names and their arcane codes. And I mimicked it. I just added this line to prefs.js:
user_pref("keyconfig.main.xxx_key75_SwitchPaneFocus(event);", "][][VK_TAB][SwitchPaneFocus(event);][");
And wouldn’t you know… it worked! Now the TAB key does what the F6 key normally does… it switches focus among the main window panes in the active tabbed view. Yay, lazy fingers cheer!
tar + netcat = very fast copy
2
9 years
I reformatted a hard disk this weekend. In the process, I needed to copy a bunch of files from one machine to the other. Since both of these machines were smaller embedded devices, neither one of them had very capable CPUs. So I wanted to copy all of the files without compression or encryption.
Normally, I would use “rsync -avz --delete --progress user@other:/remote/path/ /local/path/“, but this does both compression (-z) and encryption (via rsync-over-ssh).
Here’s what I ended up with. It did not disappoint.
Step 1 – On the machine being restored:
box1$ netcat -l -p 2020 | tar --numeric-owner -xvf -
Step 2 – On the machine with the backup:
box2$ tar --numeric-owner -cvf - | netcat -w3 box1 2020
Merging multiple git projects into one
0
9 years
Over the last few months, my daughter Sydney and I have been working on Python programming assignments. I showed her that we can occasionally make a snapshot of our work using git, so if we mess something up, we can always get back to our previous checkpoint.
So we got into the habit of starting off new assignments with “git init .“.
Recently, though, I decided I wanted to host a copy of her assignments on my home file server, so we could check out the assignments on her computer or on mine. In the process, I decided to merge all of the separate assignments into a single git project. As a matter of principle, I wanted to preserve the change histories (diffs and author and dates — but not necessarily the old SHA hashes, which would have been impossible).
I did some searching on the topic, and I found a variety of solutions. One of them used a perl script that sent me off into the weeds of getting CPAN to work. A couple of good posts (here and here) used branches for each assignment, and then merged all of the branches together. The results were OK, but I had the problem where the assignment files started off on their own top-level directory, and then I later moved the files to their own assignment subdirectories. I really wanted to rewrite history so it looked like the files were in their own subdirectories all along.
Then I noticed that my daughter and I had misspelled her name in her original “git config –global”. Oops! This ended up being a blessing in disguise.
This last little snag got me thinking along a different track, though. Instead of using branches and merges to get my projects together, maybe I could use patches. That way, I could edit her name in the commits, and I could also make sure that files were created inside the per-assignment directories!
So I whipped up a little shell script that would take a list of existing projects, iterate through the list, generate a patch file for each one, alter the patch file to use a subdirectory, (fix the mis-spelled name), and then import all of the patches. The options we pass to git format-patch and git am will preserve the author and timestamp for each commit.
#!/bin/bash

remoteProjects="$*"

git init .

for remoteProject in $remoteProjects ; do
   echo "remote project = $remoteProject"
   subProject=$(basename $remoteProject)
   ( cd $remoteProject ; git format-patch --root master --src-prefix=AAAA --dst-prefix=BBBB --stdout ) > $subProject.patch
   # essential file path fixes
   sed -i -e "s|AAAA|a/$subProject/|g" $subProject.patch
   sed -i -e "s|BBBB|b/$subProject/|g" $subProject.patch
   sed -i -e "s|/$subProject/dev/null|/dev/null|g" $subProject.patch
   # other fixes, while we're here
   sed -i -e 's/syndey/sydney/g' $subProject.patch
   # bring the patch into our repo
   git am --committer-date-is-author-date < $subProject.patch
   # clean up
   rm $subProject.patch
done

exit 0
I think this solution works nicely.
The one with the separate branches above was kind of cool because a git tree would show the work we did on each assignment. But in the end, the linear history that we produced by using patches was just as appropriate for our project, since we actually worked on a single homework assignment each week.
I suppose I could combine the two solutions by creating a branch before doing the "git am" (git "accept mail patch") step. That is left as an exercise for the reader.
iFamily
0
10 years
Like many families, we have accumulated several iPhones and iPods over the years. My wife and I have new iPhones, and we upgrade every so often, and our kids inherit our older phones. So we’ve encountered that age-old question: how should we manage the Apple IDs for all of these devices?
At first, we followed the simple approach — just leave the older devices associated with our Apple IDs. It makes some things easier. For example, the kids don’t have to re-buy the games that you bought over the last few years.
But when you share Apple IDs for all services, things get weird quickly. I started seeing my daughter’s iMessage conversations on my phone. If anyone in the family changed an account setting on any of the apps that use Apple IDs, we’d get a flood of notifications about the change, and the change would usually propagate to the other devices against our intentions. It felt like a very unstable equilibrium. Just as I’d get everything working right, something would upset the balance.
The thing that finally persuaded me to look at alternative setups was when I tried to set up “Find My Friends” so we could see where the others were. It did not want to let me track my daughter, because it thought she and I were the same user.
So I read a few discussions and articles about the different strategies for setting up Apple IDs for a family. They explained how Apple IDs work, and showed how to manage them. Some highlights:
- Creating an E-mail Account and Apple ID for your Child – Apple IDs are simple
- Moving from a shared iCloud to individual accounts – How to change your iCloud account on the phone
- Multiple Apple IDs and iOS devices in a Family – Simple list of Apple ID services (the basis for my bullet list below)
- How many Apple IDs should your family have? – Detailed list of services that use Apple IDs
OUR FAMILY’S STRATEGY
Everyone in our family now has a unique email address and their own Apple ID. My Apple ID is associated with a credit card, but theirs are just simple accounts. These can easily be set up at http://appleid.apple.com/.
Technically, since the kids are young, I have an Apple ID that they use. The contact info is mine. But the point is that each person has a unique identifier for their devices, and each one is tied to a unique email address.
The key to making this work is this sometimes-overlooked fact about how the Apple ecosystem works: a single device can use different Apple IDs for different purposes.
So in our family:
- iTunes Store – use Daddy’s ID
- iMessage – use your own
- FaceTime – use your own
- iCloud* – use your own
- Game Center – use your own
Note that iCloud is a biggie. It includes Mail, Contacts, Calendars, Reminders, Safari, Find My iPhone, Documents and Data, Photo Stream and Backups.
I’m not really sure how the iCloud Mail and Calendar stuff works, because we don’t use them. I host my own mail and calendar services on a Linux server, and that stuff works great with the iPhones. We have separate email addresses on several domains. And we have some shared calendars and some individual calendars.
Our family’s new setup puts some sanity back in the system. I know that my iMessages will only show up on my phone and Mac. I can call my kids using FaceTime without it getting confused, trying to call myself. I see my contacts, and my kids don’t. But we each get to use the games and other apps that we have bought as a family. And we can each use “Find my Friends” to keep track of where everyone is.
A WORD ABOUT EMAIL ADDRESSES VS APPLE IDS
I’m going to dive just a little deeper here, because I discovered something else in the transition that might help someone else.
Since I run my own mail server, I tend to use very specialized addresses for any kind of service that I sign up for. That way, I can sort all of my bills into a “bills” folder that I don’t have to see until it’s time to pay bills. Or if one vendor starts sending me too much junk, I can remove that one email address/alias and that stuff disappears forever.
Following this strategy, our Apple IDs are actually specially-made alias addresses in the form itunes-(name)@(ourdomain).com. But since we want to use our real email addresses for stuff like FaceTime and iMessage, we need to associate our real email addresses with these new Apple IDs. On that appleid.apple.com site, there’s a little form where you can associate all of your other email addresses to the Apple ID.
However, since we were migrating from a single Apple ID, I had to remove the kids’ preferred email addresses from my Apple ID before it would let me add them to their Apple IDs. This is very easily done on the appleid.apple.com site. However, if you just try to add the email address to the new Apple ID directly using the phone menus, it just sits there with a spinny star saying “verifying”, and it never actually sends the verification email.
So my advice is to manage your Apple IDs using the web site, http://appleid.apple.com/.
Pogo Plug v4 + Flashback
1
10 years
A timely discovery
I have been interested in automated backups of computer data since the mid 90’s, when I had a very well-timed hard disk failure. By pure chance, I had been working on a script that would copy my “important files” from my hard disk to a 100MB “Zip Drive”. I finished my script after testing it several times, and then I went to bed. The next morning, I woke up to find that my hard disk had crashed. Fortunately, I had a very recent backup!
I have often marveled at how easy it would be to lose invaluable files in a single mishap… countless memories, photos, financial records and project work. Backups are important.
BackupPC
When I worked at “the oven place” (TMIO), I was tasked with evaluating backup schemes for their factory and office PC’s. So I looked at several open source packages, with emphasis on being server-centric and automatic. That is, the backup server would decide when to make the backups, and the employees would never have to remember to do anything special. Any process that relies on a human to remember to kick it off is destined to be run once-a-year.
We ended up choosing “BackupPC“, which runs on a modest server with a large storage disk. It would wake up every so often and run through its list of clients and pick one to back up.
For several years, I ran BackupPC at home, too. At first, I ran it on a discarded PC. But later, I migrated to low-power fanless embedded boards.
Flashback
In 2013, I decided that BackupPC was taking too long to make backups. I would bring my laptop home from work and turn it on, and BackupPC would notice it and start backing it up. But the backups were taking so long that they would still be running when I was ready to leave for work the next morning! I ran a few tests with rsync to see if the problem was with BackupPC or the file compression or their crazy idea of how “incremental backups” should work. So I wrote what started out to be a speed test, and then a wrapper around “rsback”, and finally a very minimal python script that I named “Flashback“. “Flash” because it’s fast. My laptop backup, which was taking all night using BackupPC, usually completes in a half hour or less.
You can find Flashback on github.
The Pogo Plug v4
 This week, I tried out a new hardware gadget called a Pogo Plug. It is a very close cousin to the SheevaPlug, an embedded Linux board which I had been BackupPC and Flashback on. What caught my attention about the Pogo Plug v4 was:
- It has two USB3 ports.
- It has gigabit ethernet.
- It was on sale for just $20.
The only bad part is that it only has 128MB of RAM… that’s only a quarter of what the SheevaPlug has. But I am not really using the memory for anything. I am just running rsync.
I did not spend any time using the stock firmware. Instead, I immediate enabled SSH and then followed these instructions for installing Arch Linux on a USB stick, which I plugged into the top plug (the bootable USB2 one). I plugged the 1-terabyte USB2 hard disk into the back of the Pogo Plug.
Then I installed Flashback and I modified the monitor script to take advantage of the three-color LED on the front (green for sleeping, yellow for backing up, red for error).
It’s been running for about a week now, and I think it has proven itself worthy.
I’d like to try it with a USB3 hard disk, and see if it’s any faster.
IPv6 + SSL
0
10 years
by alan
in geeky stuff on 2014-02-23
My entire web site, including this blog, now supports IPv6 and SSL/HTTPS.
| protocol | Normal HTTP | Encrypted HTTPS |
| IPv4 | http://ipv4.alanporter.com/ | https://ipv4.alanporter.com/ |
| IPv6 | http://ipv6.alanporter.com/ | https://ipv6.alanporter.com/ |
You don’t have to include the ipv4 or ipv6 prefix… that’s just to force it to use one or the other. The main “alanporter.com” URL works just fine. If your computer has an IPv6 address, your browser should use IPv6. If not, it will fall back to IPv4.
If you’re interested in knowing which IP stack you are using, I recommend IPvFox and IPvFoo browser plug-ins. They show a red “4” or a green “6” in the browser address bar so you’ll know which IP stack you are using.
Some portions of this web site, like the photo gallery and this blog do not have IPv4-specific and IPv6-specific addresses. But just like the main URL, selecting a protocol stack should be automatic.
You might wonder why you get a warning when loading the pages with SSL/HTTPS. I did not send my web site certificates off to Thawte or GoDaddy or Verisign to be signed… I am too cheap for that. Instead, I signed them using my own certificate authority. If you import this CA certificate into your browser, all of my site’s certificates will be considered valid.
If you are security-minded, and you do decide to import my CA certificate, you’ll probably want to make sure that the SHA1 fingerprint is correct.
It should be AD:30:DA:F8:EA:03:A9:D5:E4:33:F4:30:F6:9C:FC:91:8A:D0:6B:06.
IPv6 at home
0
10 years
by alan
in geeky stuff on 2014-02-15
History
I’ve been running an IPv6 tunnel at home since 2010. Why? Several reasons. I’d like to use IPv6 enough that I feel comfortable with it. I’d also like to encourage service providers and web sites to start incorporating it, rather than playing funny games to extend IPv4. And finally, I am convinced that pretty soon, there will be desirable services on the web that are only available on IPv6… so far I have not heard of a killer app that is not accessible on IPv4, but it will come.
For all of this time, I have been running a tunnel from my home router to Hurricane Electric, a leading provider of IPv6 services. They use a system called “6in4”, which bundles up your IPv6 packets inside IP packets of type “protocol 41”. Most folks are familiar with TCP (6), UDP (17), ICMP (1), or maybe even SCTP (132). Well there are a lot of other types of IP packets, and protocol 41 is used to bundle IPv6 traffic inside of IPv4 packets.
The thing is, to get a 6in4 tunnel to work, you have to tell your router to allow IP protocol 41 packets through. Most routers do not do this by default.
Outage
This weekend, we had an internet outage at home. So I rigged up my router at home to connect to the internet through my neighbor’s wifi instead of through our DSL modem (this is pretty easy to do with an old WRT54G router, re-flashed with “dd-wrt” firmware). The problem is that I don’t really have any control over my neighbor’s router, and it does not pass these protocol 41 packets through. So my IPv6 quit working.
That, by itself, would not be so bad. The traditional IPv4 network still works OK. But since my home network DOES have IPv6, my web browser expects to be able to make IPv6 connections. So when I go to a web site like google.com, my browser first tries an IPv6 connection to Google. After several seconds, that attempt times out and then the browser tries an IPv4 connection. Multiply by every HTTP request, and it starts feeling dreadfully slow.
If you’re curious whether your normal browser is using IPv4 or IPv6, there is a cool browser plugin for Firefox called “IPvFox”, and one for Chrome called “IPvFoo”, that will show a “4” or “6” in the address bar. Sometimes, it will show a combination, if the web page content is coming from a mixture of sources.
I wanted to see if there was a way to get IPv6 to my home network, even when I am sitting behind my neighbor’s router.
Gogo6 / Freenet6
I dug around a little, and I found that there are other tunnel brokers that use different schemes of encoding their IPv6 packets and ferrying them to their point of presence. I found one called “Freenet6” that uses a scheme called TSP (on a TCP/IPv4 socket) to get things up and running, and then it encapsulates the IPv6 packets inside UDP/IPv4 packets. This means you can use Freenet6 when you are behind a more restrictive router like your neighbor’s, or at a hotel or a conference).
Freenet6 was not too hard to set up, but it was confusing and a bit annoying.
First, TSP needs a software client on your router. You can download one client from the Freenet6 web site. But I dislike running someone else’s client software as root on my systems. So instead I used the open source “gogoc” that is packaged for Debian.
Second, when you first connect, it might complain about keys, because you’re connecting to “authenticated.freenet6.net”, but you end up talking to “montreal.freenet6.net”. You can get around that my setting CHECK_KEYFILE=”no” in /etc/default/gogoc. I’ll want to revisit this later after things are up and running.
Third, I had a hard time authenticating. After trying many things, I discovered that there are TWO unrelated usernames and passwords that you’ll need.
- The first username/password is for the gogo6 web site. Your username there will be your email address. This is only used for the web site and forums.
- The second username/password is actually used by the gogoc client. To get this, you have to sign up for a Freenet6 Pro account. This account is free, but you have to send an endorsement on Twitter to get it… and this is done in the most annoying way. You click on “Pay with a Tweet or Facebook”, which takes you to a site called paywithapost.de. It wants you to grant access to their Twitter app called “Pay with a Tweet Social Payments”. That’s right… not only do you have to tweet, but you have to install a Twitter app that has access to your account. I used a special “shill” account that I have for just this sort of thing, and then I immediately revoked access to that app.
So, configuration and annoyances behind us, I was able to run the open source “gogoc” client, and it assigned an IPv6 address to my router (which advertised it to the other computers in my house), and now my entire home network has IPv6 access again.
I am looking forward to trying Freenet6, and seeing how it compares to the Hurricane Electric tunnel that I am used to.
I’d also like to shout out to my neighbor, who was nice enough to let us mooch off of his internet service until AT&T gets their act together.
Moving a domain to a new registrar
1
11 years
by alan
in geeky stuff on 2013-04-20
This week, I moved the “trilug.org” domain from GoDaddy to NameCheap. Our renewal time was coming up. And at the same time, we were discussing a new policy of inclusiveness and a code of proper conduct for the group. I had long felt that GoDaddy’s branding was “tacky”, and did not really align with the direction that TriLUG was heading. Really… GoDaddy Girls? It wouldn’t be appropriate to hold our meetings at Hooters, and we feel the same way about the GoDaddy Girls.
If you’ve never moved a domain from one registrar to another, it can be confusing. There are several interlocking steps that have to be done in a certain order. If you have a roadmap, it can take an hour or so. If not, you can waste a day or more waiting for all of the steps to complete.
This is the recipe that I have followed for several transfers.
From GoDaddy to NameCheap
- GoDaddy:unlock domain
- GoDaddy: send EPP (authorization code) via email
- NameCheap: initiate transfer
- NameCheap: fill in EPP codes
- NameCheap: use coupon code “SWITCH2NC”, save $1/domain
- NameCheap: submit transfer order, pay
- wait for email from NameCheap
- receive email from transfer-domain.com (for NameCheap)
- click on link, agree to the transfer
- wait for email from GoDaddy
- receive email from GaDaddy
- GoDaddy: pending transfers, accept or decline
- you’re done – wait for email confirmations
- email from GoDaddy, domain is transferred
- whois reports new registrar
- email from NameCheap, welcome
At this point, it’s a good idea to double-check that your DNS settings transferred correctly. Mine always have.
I hope that your transfer goes as smoothly as ours did.
iPhone photo gallery
0
11 years
I like to keep albums of recent photos on my iPhone, so I can show them to friends and family. Not only do I keep the photos that I took on the iPhone itself, but I also keep the photos I took using other cameras. Here, I will describe the method and tools I use to keep several months worth of photos conveniently in my pocket.
At first, this seems like a very simple problem, but there are a few subtle quirks, and I have worked around them using a script and some open source tools. In the end, I will have:
- photos from multiple cameras
- selected folders, but not necessarily everything
- photos are optimized for phone size, not wasting space
- photos are oriented correctly, not sideways or upside-down
- photos from multiple cameras appear in chronological order
- process is mostly automated
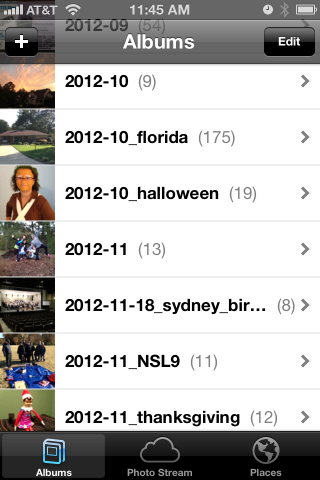
The end result looks like this:
iPhone “Photos” app showing albums
How my photos are organized
When I worked at Ericsson’s research lab in Singapore, they had done a study on how people store their digital photos and how they find a particular one in the bunch. They found that people tend to associate events with nearby dates, so they might say “Let’s see… Bill broke his leg skiing right before Janet’s wedding, so that must have been Winter of 2009”.
I definitely fall into that category, and so my pictures are stored in folders by date. It looks like this:
pictures     - top level
+ bulk       - raw unprocessed stuff, too big to browse
+ import     - a working area
+ y          - photo albums arranged by year/month/event
  + 2011
  + 2012
    + 2012-09
    + 2012-10
    + 2012-10_florida
    + 2012-10_halloween
    + 2012-11
    + 2012-11-12_ducks
    + 2012-11-18_sydney_birthday
    + 2012-11_NSL9
    + 2012-11_thanksgiving
  + 2013
I also want to note that some of my friends take a completely different approach… they pick a single tool and simply dump the photos into the tool. They don’t care to organize them at all and just rely on the tool. That’s certainly OK… I would guess these are the same people who don’t balance their checkbooks. If that describes you, then I suggest you stop reading here, because none of this will apply to you.
I have used the date-folder method since I got my first digital camera in 1998. It has migrated from Windows to Linux to MacOS. My data far outlasts any one tool.
So one of my assumptions is that my “pictures” directory is sacred. I do not want any tool to write anything to that directory (I am looking at you, iPhoto & iTunes).
Selecting folders (albums) to copy to the iPhone
So I set up two more directories.
- $HOME/iphone/pictures – where I say what photos to copy
- $HOME/itunes/pictures – a directory that iTunes can sync with
In the first one, $HOME/iphone/pictures, I set up a bunch of symlinks to point to the directories that I would like to copy. I do this so I can easily select some folders but leave out others.
2011-11_happy_crabby       -> ../../pictures/y/2011/2011-11_happy_crabby
2012-09                    -> ../../pictures/y/2012/2012-09
2012-10                    -> ../../pictures/y/2012/2012-10
2012-10_florida            -> ../../pictures/y/2012/2012-10_florida
2012-10_halloween          -> ../../pictures/y/2012/2012-10_halloween
2012-11                    -> ../../pictures/y/2012/2012-11
*** note - no ducks here ***
2012-11-18_sydney_birthday -> ../../pictures/y/2012/2012-11-18_sydney_birthday
2012-11_NSL9               -> ../../pictures/y/2012/2012-11_NSL9
2012-11_thanksgiving       -> ../../pictures/y/2012/2012-11_thanksgiving
For example, let’s say I took 1000 boring photos of ducks in November. I could easily skip 2012-11-12_ducks by not creating a symlink. I can also specifically include a very old folder by leaving the symlink in this directory. I have done that here with my Happy Crabby pictures from 2011.
Copying and processing photos
I have written a script that will go through each of these directories and perform a few clean-up tasks as it copies the photos to the itunes staging area.
- It copies the photos to a temporary working directory.
We should never alter the original photos… always work with a copy.
- It rotates the image based on the EXIF orientation tag.
I’m gonna start slamming on Apple, so fanbois should cover their ears. I have found that Apple handles image rotation differently than everyone else, and it took a while to get a handle on it. I can take pictures on my iPhone and email them to someone and they’ll show up as upside-down or sideways. The images look OK on the iPhone or on a Mac, but everyone else (Linux, Windows) sees them rotated. The same thing happens if I upload them to “gallery”, an online photo gallery. Sometimes, they would show the correct dimensions but the image would still be rotated. That is, a portrait would be taller than wide, but the person’s face would be sideways and extremely elongated. The solution I found is to process them using “renrot” (see my blog post about renrot for detail).
- It renames the file using the date & time in the EXIF data.
When we get back from vacations, I find that we have photos from several different cameras, and it just seemed weird for my wife’s Nikon images (named DSCNxxxx.JPG) to appear before my iPhone images (named IMG_xxxx.JPG) and then my Panasonic images (named Pxxxxxxx.JPG) last. If I rename all of the images to (YYYY)(MM)(DD)(hh)(mm)(ss).JPG, they will appear in chronological order, regardless of which camera was used.
- It resizes the image to be no bigger than 1280 pixels high or wide.
There is no need to me to waste space on my iPhone by storing each image in their 12MP glory (actually, I typically shoot 3MP for normal vacation photos). So I resize the images using imagemagick.
- It moves the files into the iTunes directory in numerical (chronological order).
At one point, I had a problem with iTunes arranging my photos in the order that they happened to appear in the directory instead of sorted by name or anything else. If you do a “find” command on Linux or a Mac, you’ll see the files in the order that they appear in the directory file. That’s OK under the hood, because “ls” and Mac Finder and Nautilus are all smart enough to show the files in sorted order. But no, not iTunes. So I move the files from the temporary work area to the iTunes sync directory one at a time, in chronological order.
Using the script
When it’s time to sync my iPhone (less and less frequent these days, and primarily driven by when I want to update my photo albums), I simply look over the symlinks, run the script and then sync.
Running the script takes a few minutes, and syncing all of the pictures instead of just the ones that have changed takes a few minutes as well. But I am very happy with the consistent results.
I’m sure that some folks will claim that I am “doing it wrong”, that I should not have to do so many work-arounds. But the bottom line is that I encountered real-world problems from the interaction between various cameras and the quirks of iTunes, and this script smooths out all of the wrinkles. It is really no trouble to run the pre-syncing script before syncing, and it does solve the problems of images being mis-rotated, taking too much space on my phone, and appearing out of order. It also makes it trivial to choose which album folders are copied to the iPhone and which ones are not.
The script itself appears below.
The pre-syncing script
#!/bin/bash
shopt -s nocaseglob
shopt -s nullglob

src="$HOME/iphone"
dest="$HOME/itunes"
if [ ! -d "$dest" ] ; then mkdir -p "$dest" ; fi

echo "=== PHOTOS ==="

wildcard="*.[Jj][Pp][Gg] *.[Jj][Pp][Ee][Gg] *.[Pp][Nn][Gg]"
stage="/tmp/itunes.$$.stage"
mkdir -p $stage
rm -rf "$dest/pictures"

# go through each directory, and do some processing
( ls -1 $src/pictures ) | while read d ; do

   # skip non-directories
   [ ! -d "$src/pictures/$d/." ] && continue

   echo "processing photos in [$d]"
   indent="   $d >> "

   # copy source photos to staging area
   ( cd $src/pictures/$d ; cp $wildcard $stage/ )

   # rotate
   echo " - rotating photos"
   ( cd $stage ; renrot $wildcard ) 2>/dev/null | sed -e "s/^/$indent/g"
   rm $stage/*_orig 2>/dev/null

   # resize
   echo " - resize photos"
   # iphone 4S screen is 640x960 (2xVGA)
   ( cd $stage ; mogrify -verbose -geometry '1280x1280>' $wildcard ) 2>/dev/null | sed -e "s/^/$indent/g"

   # move to itunes area, reorder as you go
   echo " - re-ordering files"
   mkdir -p "$dest/pictures/$d"
   ls -1 $stage | while read f ; do
      # Mac bash v3 does not have ${f^^*}, so we have to use 'tr'
      upper=$(echo $f | tr /a-z/ /A-Z/)  # was bash internal ${f^^*}
      mv -v "$stage/$f" "$dest/pictures/$(basename $d)/$upper" | sed -e "s/^/$indent/g"
   done

   echo ""
done

# clean up some special cases
xargsR='-r'
[ "$OSTYPE" == "darwin12" ] && xargsR=''  # Mac xargs does not have -r
find $dest/pictures/ -type d -print0 | xargs -0 rmdir 2> /dev/null # empty directories
find $dest/pictures/ -name \*_orig -print0 | xargs -0 $xargsR rm -v
find $dest/pictures/ -name MEDI\*.JPG -print0 | xargs -0 $xargsR rm -v
echo ""